
Star trails are stunning; on this we’ll have to agree. Maybe you’ve seen one of these images and wondered about how it’s done, or you’ve tried it yourself but need a tip or two about the process. Either way, this post is for you.
The trails can be achieved by taking a single long exposure (from 40 minutes to a couple of hours) or by stacking several images to create an incredibly long exposure. As the Earth rotates on its axis, a long exposure causes the stars in the sky to appear to have elliptical or circular “trails” caused by the changing position of the stars while the landscape sits still, so to speak, as its relative position to the camera doesn’t change. However, I don’t recommend doing a single long exposure because the camera sensor will heat and cause much higher noise in your image. Also, any residual light/light pollution will be amplified. Instead, my preferred method is to take a sequence of several images with shorter exposure times, then, to get the star trails, “stack” the images in post production using image stacking software. Post processing is covered in Tutorial: Shooting Star Trails (Part II of II – Processing and Retouching).
Where
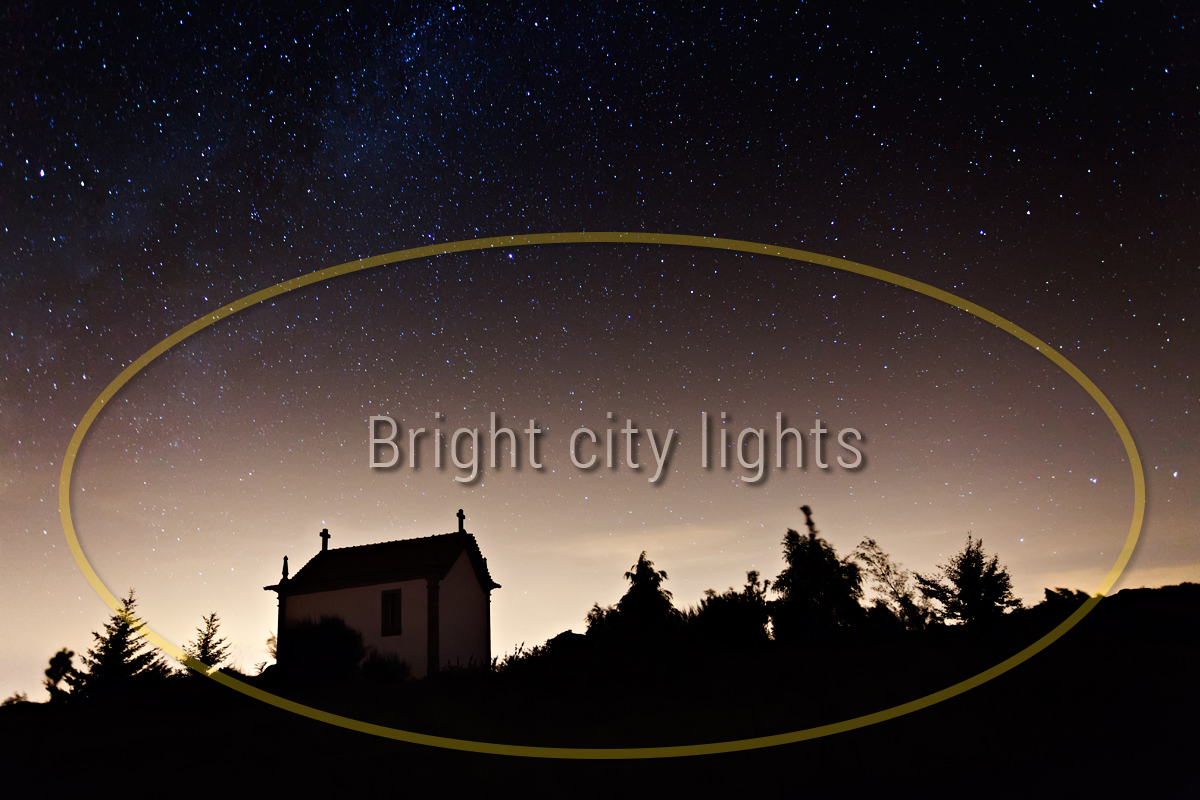
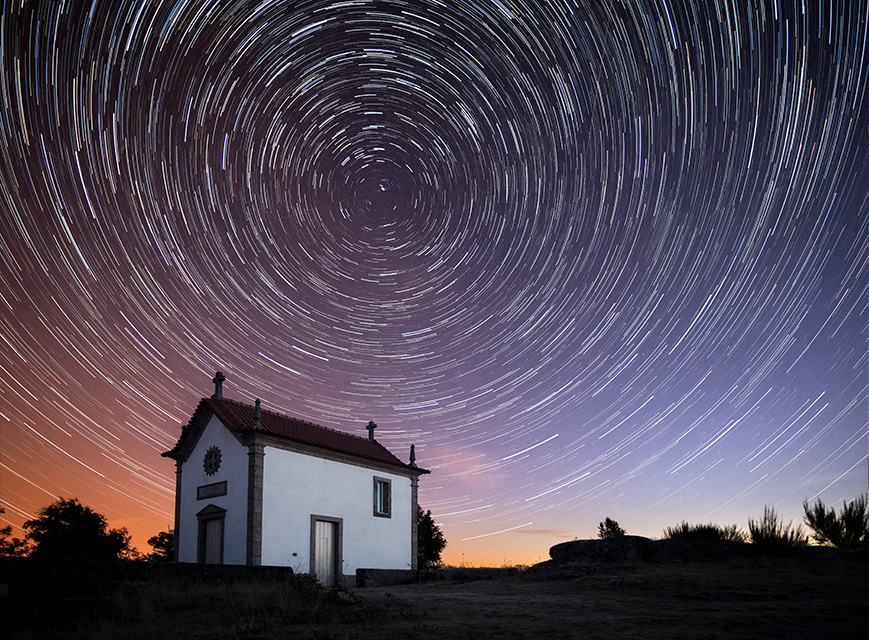
One of the main problems with night photography is the way light pollution (from cities, street illumination, etc.) interferes with exposure and affects sky visibility. Because of this, try to find a remote location as far away as possible from any light interference. Even if those lights are not in your framing, you’ll see it in your final image. For example, in the image below, the bright golden light near the horizon is the light coming from a nearby town, even though we were several miles away and couldn’t see it very well with our naked eye.
Star trails are a treat for the eyes, but if you want your image to pop, find something that helps the composition to turn your image into more than just an awesome sky. Scout your surroundings for interesting remote architecture (houses, barns, churches and so on), trees, rocks or anything you find appealing to create your composition.
When
As with city lights, the moon can be troublesome. I recommend going out on a moonless night. You can find out when the moon will be visible with a program/app called The Photographer’s Ephemeris (free for Mac and PC desktops or paid versions for iOS/Android devices).
A simpler, free, android app is Local Sun and Moon. It doesn’t have many bells and whistles, but it does include information on moon phases, moonrise and sunrise times. There are, of course, other apps for this, but these are the ones I use.
Another thing you should look up is a cold and dry night. The reason is cold nights tend to be drier and less humidity causes less diffraction and, therefore, clearer nights.
Equipment
TRIPOD – As we are using long exposures to capture the Earth’s movement, you will need to use a tripod. Get a sturdy tripod with your head of choice and take it with you. Yes, they can be heavy and cumbersome, but they are absolutely necessary for star trail photography.
REMOTE SHUTTER RELEASE – A remote shutter that can be put in a locked position is also a must, because manually pressing the shutter button can introduce camera shake even when using a tripod. More importantly, we’ll be capturing images for an hour or more, and a remote shutter in the locked position will allow us to not have to worry about the next click. With my Canon EOS 5D Mark II, I use the Canon RS-80N3 remote shutter, which is as simple as it gets (a shutter button that can be locked).
CAMERA/LENS – As for camera and lenses, any combination of a DSLR and lens will do, but if you want to get as much sky as possible, a wide angle lens is best. (I often use the Canon EF 17-40mm F4 L at 17mm.) For this kind of shot, we’ll shoot wide open (or as open as we can) so, if you have a F2.8 (or faster) lens, all the better. If you’re using a faster lens, you may even want to close it down a stop or two to get more sharpness, but try to keep the aperture at F4 or below, because the bigger the aperture (smaller F number), the more light is let in, and the brighter your star trails will appear.
FLASHLIGHT – Our cameras see far better in the dark than we can, so bring a flashlight. An extra set of flashlight batteries may come in handy, too.
Other stuff you may need
Bubble Level – When trying to shoot in a pitch dark place, you’ll have some trouble keeping things level, so I recommend using a bubble level. Your tripod or tripod head may already have one, or you can get a cheap level that fits your camera’s hot shoe. You can also use something like this app for your smartphone.
Food/Water/Entertainment – You’re about to spend several hours in a remote location waiting for your camera to do its thing. I recommend bringing water, food, and maybe a nice collection of music on your phone or mp3 player. It is also a good idea to bring a friend. Bad things can happen (127 hours style), and having someone by your side is always a good idea. If you’re going alone, be sure to tell someone where and when you’re going. That way, they can come find you if you happen to fall asleep in the field (or something else).
What are we doing?
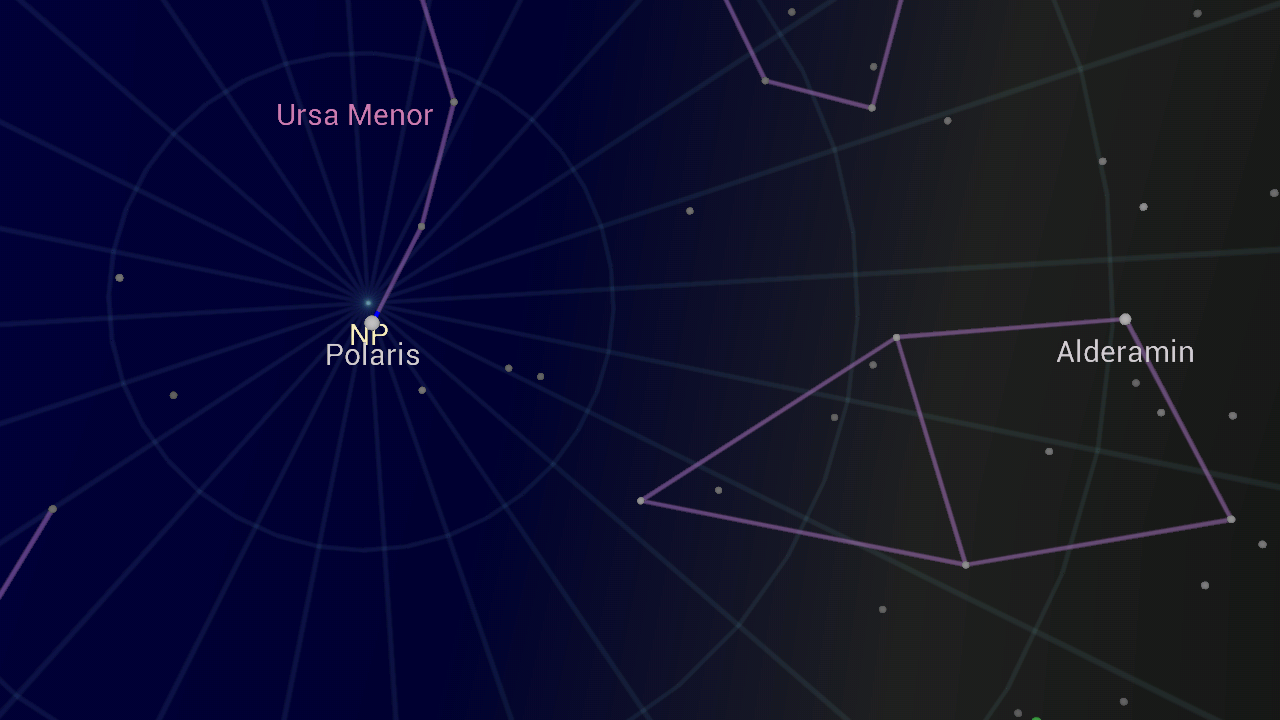
To achieve the best “rotation effect,” face due north if you’re in the Northern Hemisphere, or due south if you’re in the Southern Hemisphere. You can bring a compass along to help you. Even better, locate the North Star (Polaris) if you’re in the Northern Hemisphere, or the South Star (Sigma Octantis) if you’re in the Southern Hemisphere. Sigma Octantis is not as easily visible to the naked eye, but it can be found via the Southern Cross method. If you have a smartphone, you can use an app like Google Sky Map (Android Version), too. Just open the app, point it to the sky and locate Polaris or Sigma Octantis depending on your location. Since these two pole stars are aligned at either end of the Earth’s axis of rotation, they will appear to be fixed in place with all the stars appearing to move around them. Therefore, if you frame your photo with Polaris or Sigma Octantis on the center of the frame, you’ll get perfect circle trails. Of course, sometimes you may want to play with the star trails. Facing east or west can give very interesting star trail variations.
We want to capture the movement for at least an hour, so we’ll take a series of 30-second exposures. That’s 120 shots an hour. We’ll then stack them in post processing to achieve the desired result.
The shoot
You’re on your location with all the needed equipment and are ready to start shooting. If you did your homework you know where to stand. Find Polaris or Sigma Octantis, mount the camera and lens on your tripod and compose your shot.
Don’t forget to turn off Image Stabilization (IS on Canon, VR on Nikon, OS on Sigma, etc.) on your lens or camera (if it has that function) as your camera/lens will already be stabilized on the tripod. Image Stabilization will actually try to compensate for non-existent shake and cause the opposite effect (i.e., leaving it turned on will actually create camera shake when the camera is mounted on a tripod).
Settings
Your camera’s light meter will be useless in the dark, so you’ll need to set the camera into manual (M) mode and select your own exposure settings. I generally use F4 / ISO 1600 / 30s.
Shoot “RAW” if you can. You’ll get broader dynamic range to work with in post processing.
Focus
You might be wondering about how to focus. Your camera won’t be able to autofocus in these lighting conditions, so you’ll need to switch to the manual focus setting and focus manually.
As you’ll want the sky as sharp as you can get it, you’ll have to focus on infinity. That means you should put your lens in manual focus and turn it all the way to infinity. There’s a scale for focusing distance on most lenses. If your lens doesn’t have this scale, you can figure out which way is infinity focus by turning the manual focus ring all the way to the right. If the sky appears in sharp focus, that’s where your lens focuses on infinity. If the sky looks blurry, try turning it all the way in the opposite direction. (Different camera brands will do this in different ways, because if one brand does this by turning right, another brand thinks it’s cool to do it the opposite way). If you have a scale, it will look something like the image below:
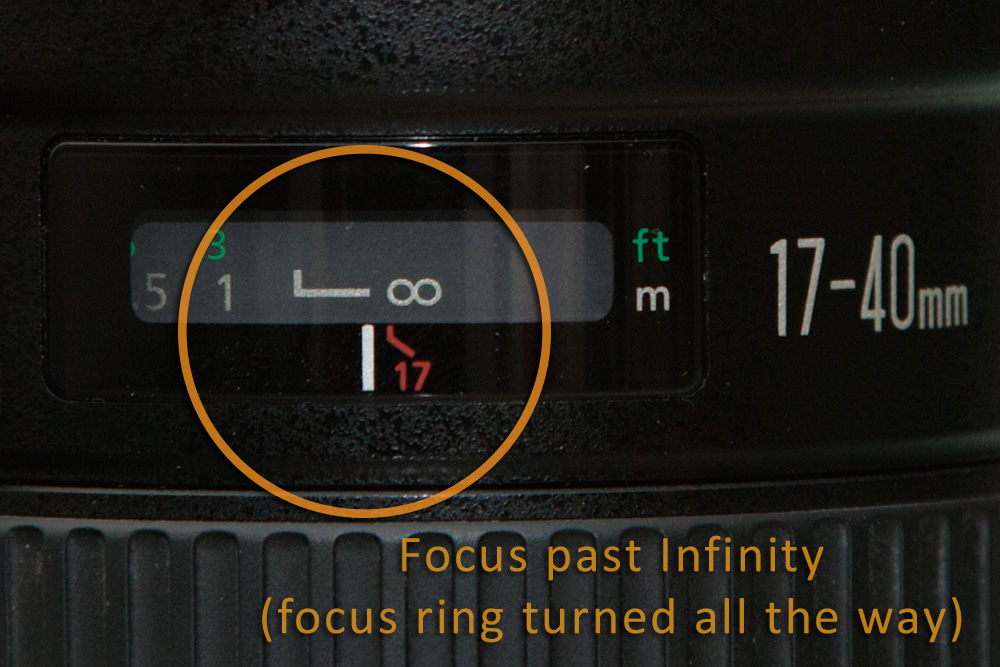
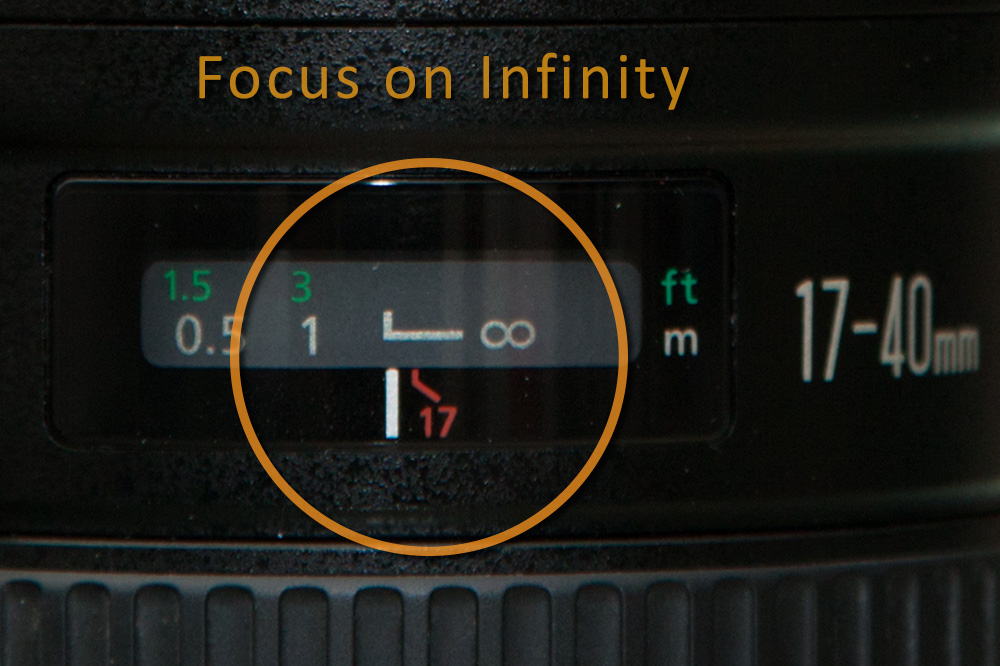
Now that you’ve turned the focus ring all the way past infinity, you’ll have to turn it a bit in the other direction to put it exactly on the infinity mark like this:
Depending on your framing, lens used, distance to foreground and because we’re using a big aperture (small aperture number), your foreground may be out of focus since we’re focusing on infinity. This means you may have to do a single exposure with focus on the foreground. In post-processing, we’ll be able to use this shot and have both the foreground and the sky completely sharp. You may do this in the beginning or the end of your sequence, as long as you have your camera steady on the tripod. For the sake of this tutorial, we’ll do this in the beginning so we won’t forget it.
Check your composition
With your lens focused on infinity, take a test shot. Recompose if necessary. Once you’re happy with your composition, you’ll need to take care of two more things before you begin capturing the star trails: getting a photo with the foreground in focus, and the dark frame.
The foreground shot
At this point, you should be happy with your framing.
Next, we’ll want to get an image with the foreground subject in focus (in the example above, I focused on the church). Why? Depending on your framing, lens used, distance to foreground, and because you’re using a big aperture (small aperture number), your foreground subject may be out of focus since the rest of the images taken during this shoot will be focused on the sky (infinity focus). In post-processing, we’ll combine this foreground shot along with the rest of the images so that both the foreground and sky will both appear sharp in your final image.
You may create this shot in the beginning or the end of your shoot. For the sake of this tutorial, we’ll do this in the beginning so we won’t forget it.
There are several ways of doing this but here is how I do it:
For focusing on the foreground, use manual focus. Use a flashlight or some other illuminated reference to light your foreground subject so you can see what you’re focusing on. If possible, use “live view” and zoom in on the spot you want to focus on. Turn the focus ring until your foreground appears sharp. Take your shot. On a small LCD display like the one on the back of your camera, things may appear more in focus than they actually might be, so take the time review your image in playback mode, and zoom in to 100% to check for sharpness.
You may also want to adjust your exposure settings so that the foreground is exposed to your liking. You don’t need to worry about the sky in this shot as we will remove it in post. Another approach would be light painting the foreground with a flashlight or flash. If you opt for light painting, be sure to keep your light source moving, so it won’t overexpose the image.
After you take your foreground photo, don’t forget to set the focus to infinity again. Also, if you changed your exposure settings for this shot, make sure to change them so that the sky is properly exposed during for the star trail images.
The Dark Frame
Because we’re making long exposures at a relatively high ISO, images are prone to noise and the effects of sensor heating, which causes all kinds of undesirable effects, like burned pixels, noise patterns and so on. So, we’ll want to take a dark frame shot. Basically, cover the lens (using the lens cap or jacket or something else to cover the lens) and take a photo with your pre-determined settings (manual focus set to infinity*, with the same exposure settings you selected previously). You can do this at any time, before or after the other shots. This dark frame will be useful in post processing as the software we’re using will be able to use it to subtract noise and artifacts from our shots. Pretty neat, huh?
* Some cameras will lock the shutter and not let you take a photo if it can’t acquire auto focus lock (such as trying to shoot a dark frame). So, for this, as with the rest of the shoot, use manual focus.
Shooting the trails
Set your camera to continuous shooting mode (or whatever it’s called by your camera manufacturer), press the shutter button on your remote shutter release, and put the shutter in the locked position. What this will do is keep shooting 30-second exposures as long as the remote is locked. You can now lie down and wait, but be sure to check your camera every 15 minutes or so. Batteries may run down or condensation may form on the front of your lens, depending on the weather. If something like this happens, turn off your remote, take care of the problem and continue from where you left off.
Depending on the effect you want, keep shooting for at least an hour. More time means longer trails (but shorter times may do what you want).
And that’s it for this first part of the tutorial. In Part II we’ll take a look at processing all these images into one glorious star trail image by stacking them together and then retouching.
If you have questions or suggestions, please leave a comment below. Stay tuned…

3 thoughts on “Tutorial: Shooting Star Trails (Part I of II – The shoot)”
Great article my friend, I will try it… some day 😀
Cheers
Abraço e parabéns pelo bom trabalho.
zacariasdamata
Muito bom, fico a aguardar a parte 2:)